I am a quasi-hobby independent Stampin' Up! demonstrator. I do not book parties but I specialize in one on one instruction plus I still wanted a space to show off my cards and share advice about stamping and papercraft. Enjoy! All stamped images and paper are (c) Stampin' Up.

Shop Now

Click here to shop Stampin' Up. You can order stamps and supplies without having a party and still get Stampin' Rewards.

Sunday 17 December 2017

December Stamping Project: Team Swap Christmas Card

I'm going to be posting a bunch of Christmas cards in the coming days and I'll start with one made for my team swap. At first I didn't know how to feel about my design, mostly because I made my cards with plenty of time to spare. The downside to getting cards done early is that you want to add or change them the more you look at them. I resisted that! I had some fun trying out new techniques though, such as inking an embossing folder before running it through my Big Shot. This effect is so sharp, especially when you use it with a contrasting colour instead of the matching paper colour.

Click for larger

Here are just some of the cards I received in return from the swap. I'm so fortunate to have a great team.
 
Click for larger

Stay tuned for more cards!

Your Friend, Christine


Sunday 26 November 2017

November Stamping Project: Peace on Earth Christmas Cards

Nothing puts more fear into some hearts than Christmas cards. Start them in July? Get them out on time? I would love to make handmade Christmas cards if I had the time...

Never fear! You can totally stamp a stack and give a special handmade card easier than you think! You just need a little planning and you'll have a stack in no time by designing a card around two stacks of paper. Pick one task per night and you can make them in a week. Promise!

This card uses the One Sheet Wonder technique, if you need to brush up on it. Another thing to note about this design is that you can make horizontal or vertical cards - as long as the sentiment square covers the seam of the two papers.

Supply list for many cards

  1. Score as many sheets of Garden Green and Cherry Cobbler down the middle for the number of cards that you want to make. Cut in half but do no fold to make card bases.
  2. Measure the largest square from Stitched Shapes against a sheet of Whisper White cardstock and cut strips of paper. You should be able to get 9 squares from a sheet. Die cut the squares from the strips.
  3. Use the Peace on Earth stamp to stamp sentiments on the squares. Use either Old Olive or Real Red ink, or both!
  4. Select one sheet of each design from the Quilted Christmas 6x6" DSP paper pack. Follow the One Sheet Wonder technique to create a variety of pieces to create card fronts from.
  5. Pair up a big piece of DSP with a small piece for the number of cards you are making. Line them up together and trim, if necessary, so that the two pieces are flush with each other.
  6. Carefully tear two pieces of washi tape and adhere the two pieces of paper at the seam. Wrap the tape around the front and back edge - no need to cover the part that will be covered by the sentiment.
  7. Run adhesive over the back of the new card front you just created and adhere to the front of the card, centering it in the middle.
  8. Take your sentiment squares and pop them up with Stampin' Dimensionals.
  9. Trim copy paper into 7.5x10" sheets, then cut them into quarters measuring 3.25x5". Adhere them to the inside of the card, or stamp another sentiment inside - it's up to you!
Here is step 4 and 5 in action. The washi tape is from last year's tin of cards.

You can have the small piece at the top or bottom of your card - it's up to you!
Now, this it the part of the card that I can't tell you how to do, because it's up to you! You can take your favourite Christmas dies and die cut shapes from gold and silver foil paper (hey, Stampin' Up! sells that too). In my sample photo, I used the stars from Starlight Thinlits Dies and discontinued nesting stars. You could add any of the lovely shapes from Pretty Pines Thinlits Dies. My tip for die cutting foil paper is to make sure that the foil side is against the die for a perfect cut. Cutting against the back can rag the foil.


And there you have it! You can stamp a stack for Christmas and share what you love with your special friends and family :-)

Your Friend, Christine


Tuesday 21 November 2017

One Sheet Wonder - What?

I decided to introduce this technique ahead of November's stamping project - the One Sheet Wonder! If you haven't heard of it before, it's a great way to save paper and pennies by using one sheet of paper to cut out all your shapes. Given the cost of paper, I'm all for thrifty projects. You can One Sheet Wonder any size of paper. Here's how I decided to divide 6x6" sheets of Quilted Christmas paper from Stampin' Up.


How many card fronts can you make with one package of paper?


  1. Cut the 6x6" sheet of paper in half so that you have two 3x6" strips.
  2. Cut a 3x3.25" piece from each strip.
  3. Cut the remaining piece in half so both pieces are 3" wide.
Super simple, right? If you choose one sheet of paper of each design, you'll have lots of pieces to mix and match for card fronts. Stay tuned for the finished project!

Your Friend, Christine


Friday 27 October 2017

October Stamping Project: Smitten Mitten Greeting Cards

If it feels like I skipped over Halloween - I have! Unfortunately I don't have any little goblins and ghouls to make a craft for. Autumn in Calgary is a very short season - maybe a few weeks before we're launched into winter. I designed this card as mini-glove weather approached.


Click for larger image

Supply list for two cards

  1. Score a sheet of Whisper White down the middle. Do not fold or cut in half yet.
  2. On the right hand side of the Whisper White sheet, stamp mittens and patterns all over in Powder Pink ink.
  3. Cut in half to make two card bases.
  4. Flip the cards over and stamp the non-mitten sentient inside with Rose Red ink. Add a tiny mitten too!
  5. Use up largish scraps of Whisper White by stamping the mitten sentiment twice in Rose Red ink. Die cut.
  6. Die cut two solid mittens from Rose Red cardstock.
  7. Cut one long 2x11" strip from a sheet of Powder Pink cardstock and cut in half.
  8. Emboss with cable knit embossing folder.
  9. Go back to your card bases and sponge Powder Pink ink around the edges.
  10. Time to assemble! Adhere the embossed strip to the front of the card. Layer the solid mitten behind the stamped mitten. Voila!
You could also try making this card vertical or use the Softly Falling embossing folder instead. Imagine all the cool colour combos you could do - purple, red, green, blue - I went with pink tones to be a little different :-)

Your Friend, Christine


Sunday 24 September 2017

September Stamping Project: Sunflower Blessings

My brother is finally seeing the results of all his careful tending of his sunflowers this summer - bright, beautiful blooms. I was thinking of him when I designed this card since we're both autumn babies. Fall itself, despite all its splendid colours, tends to get lost between back to school, Halloween and Thanksgiving. Of course I'm partial to the new designer series paper in the 2017 Stampin' Up holiday catalogue and couldn't wait to order some. In this card we can take advantage of the watercolour look of the Painted Harvest set and do some two step stamping.

Click for larger
 
Supply list for two cards

  1. Score an 8.x5x11” sheet of Very Vanilla cardstock down the middle. Do not fold. Cut in half to make 2 4.25x5.5” card bases.
  2. Stamp all over the front of the cards with the mesh stamp from Best Birds in Sahara Sand ink.
  3. Load up a Stampin' sponge with Sahara Sand ink and sponge around the edges and towards the top of the card front.
  4. Cut one 3.25x8.5" panel from the green striped sheet from the Painted Autumn DSP package and cut in half to make two panels sized 3.25x4.25". Adhere each panel to the card front aligned to the bottom centre of the card front.
  5. Stamp the "When I count my blessings" sentiment stamp on the inside of each card in Early Espresso ink.
  6. On another sheet of Very Vanilla cardstock or a large scrap piece, stamp the "Thinking of you" sentiment stamp twice from Count My Blessings in Early Espresso.
  7. I freehanded the banner shape - draw very lightly around the sentiment and cut out. Sponge around it with Sahara Sand.
  8. Here's where you can really utilize your Very Vanilla scraps - we all have that box of them! Load up the more solid leaf and stem shape from Painted Harvest with Wild Wasabi ink and stamp 7-8 of them. Then load up the other leaf and stem shape with garden green and carefully stamp on top of the other stamped image. Punch each one out with the Leaf Punch.
  9. Again on Very Vanilla, stamp the more solid sunflower shape with Daffodil Delight ink six times. Load up the other sunflower shape with all the petals with Crushed Curry and carefully stamp on top of previous image. Stamp the centre with Early Espresso. I used a brown marker to fill in the centre more, by the way. Fussy cut out each sunflower with scissor snips.
  10. Time to assemble the rest of the card. Adhere the punched leaf shapes at the top of the green striped panel and save one for below the sunflowers. Adhere two sunflowers side by side and then use one or two Stampin' Dimensionals for the flower on the middle. Then adhere the banner down and you're done!

Well, winter's chill is on the doorstep, so stay tuned for some wintery greetings next time!

Your Friend, Christine


Sunday 20 August 2017

August Stamping Project: Sending Lots of Love Card

I missed blogging in July because July was full of tough stuff. One of my pets died, a family member had surgery and one of my SU team mates took ill and passed away. What do you - what does anyone - say in these heartbreaking times? Saying the right thing is so important and often we can find ourselves at a loss for the right words. Even Google can’t help sometimes. Fortunately I could lean on my Stampin’ Up collection for the perfect thing to say for one situation. Crafting definitely saved my sanity in July and August!

Click for larger size

Supply list for two cards

  1. Score an 8.x5x11” sheet of Pink Pirouette cardstock down the middle. Do not fold. Cut in half to make 2 4.25x5.5” card bases.
  2. Stamp all over the right side of the sheet with the mesh stamp and Power Pink ink.
  3. Stamp large dragonfly from Dragonfly Dreams in Fresh Fig on front of card bases. I used a Stamp-a-ma-jig to position the dragonflies.
  4. Cut two 3.5x5" strips of vellum and stamp randomly all over it with the small flower stamp from Touches of Texture in Melon Mambo ink. Cut the strip in half when done.
  5. Stamp two Sending So Much Love stamps on Whisper White cardstock and fussy cut around it with scissor snips.
  6. I freehanded two hearts from Cherry Cobbler, but you could use one of the hearts from the Sweet & Sassy Framelits Dies set. You may want to add more hearts.
  7. Time to assemble! Centre the vellum strip on the card base and adhere with tear tape in the middle. Affix the heart to the right side of the card. Use a few Stamping Dimensionals and mount the sentiment to the top of the card.

I hope this blog post finds you all well and until next time...

Your Friend, Christine


Saturday 1 July 2017

July Stamping Project: Canada Day Card Crafting

Happy Canada Day! I made these cards earlier in June, then I took ill with a cold that lasted forever, so I didn't get a chance to give them to anyone. They were easy to design and made with just a few supplies. Sometimes there are some stamps that one uses a lot and I find myself always breaking out the Vintage Leaves stamp set. Maybe it's because I'm a nature lover or that I love the versatility of this set for any occasion. These Canada Day cards would be perfect for invitations to a celebration or barbecue. While there is a matching die set for Vintage Leaves, I fussy cut the leaves out with Paper Snips.

Click for larger!

Supply list for flag card
This is a great way to use up leftover strips of Whisper White in your scrap bin!
  1. Score a sheet of 8.5x11" Real Red cardstock down the middle. Do not cut in half.
  2. Stamp all over the right side of the sheet with the maple leaf stamp and Real Red ink.
  3. Cut sheet in half to make a 1 4.25x6" card base (12x12" Real Red cardstock works better - it is now sold in a "best of" pack). Trim the card base to make a 4x6" front facing card.
  4. Cut a 2.5x4" strip of Whisper White cardstock sheet and stamp all over it with the maple leaf stamp in Power Pink ink.
  5. Sponge Power Pink ink around the edges of the white strip.
  6. Stamp a maple leaf in Real Red ink on Real Red cardstock and die cut or fussy cut.
  7. Die cut a stitched circle using the 3" circle from Whisper White cardstock.
  8. Time to assemble! To maintain the flag ratio, adhere the white strip in the middle, about 1 5/8" from the left side. Affix the maple leaf to the circle. Use dimensionals to pop up the circle.
You could also had a white panel inside for your message or choose another sentiment stamp too.

Supply list for celebrate card
Birthday Blast was a 2017 Occasions stamp set, but you can use any other similar greeting.
  1. Score a sheet of 8.5x11" Whisper White cardstock down the middle. Do not cut in half.
  2. Stamp all over the right side of the sheet with the maple leaf stamp and Power Pink ink.
  3. Cut sheet in half to make 2 4.25x5.5" card bases.
  4. Fold card bases in half and sponge around the edges of the card in Power Pink ink.
  5. Stamp a maple leaf in Real Red ink on Whisper White cardstock and die cut or fussy cut.
  6. Sponge Real Red ink around the inside of the maple leaf.
  7. Stamp sentiment in Real Red ink on Whisper White cardstock and die cut or fussy cut.
  8. Cut a 1x4.25" strip of Real Red cardstock and stamp all over it in Real Red with the maple leaf stamp.
  9. Time to assemble! Centre the sentiment on the Real Red cardstock strip. Position it 1" from the bottom edge of the card and adhere. Use dimensionals to pop up the maple leaf above it.

Until next time!

Your Friend, Christine


Monday 26 June 2017

New Catalogue Favourites Part 3

My last favourite product from the new Stampin' Up catalogue is the Pinewood Planks Dynamic Textured Impressions Embossing Folder. It may be a funny product to spotlight given all the new, exciting stamps, but it's exciting to me. In the past, woodgrain embossing folders and texture plates were always too detailed and weakened the piece of cardstock. The result was very bendy! I like the Pinewood Planks Dynamic Textured Impressions Embossing Folder because it leaves a realistic woodgrain background without completely compromising the cardstock. Maybe I also love it because I live in Calgary, Alberta, Canada and it's perfect for any Western themed idea!


Click for larger!


Your Friend, Christine


Sunday 18 June 2017

New Catalogue Favourites Part 2

My next favourite product from the new Stampin' Up catalogue is the circle tab punch. A collective oooooh went up from the crowd at OnStage when it was revealed! It's easy to forget that punches still exist in this whiz-bang world of cutting dies, but they are still very versatile and easy for little hands to use. What can you do with a circle tab punch? Plenty:
  • Make tabs for your planner, sketch book or index cards
  • Make quick holders for your Stampin' sponges
  • Affix other die cuts to the tab for pocket cards
  • Hole punch to make tabs for a mini album
  • Just use as a fun shape!

There is also a matching stamp set called Tabs for Everything.

Click for larger!


Your Friend, Christine


Saturday 10 June 2017

New Catalogue Favourites Part 1

Huzzah! It's the best time of the year in Stampin' Up land - the new catalogue is officially out! I received the new catalogue back in April at OnStage, but had to keep it's wondrous surprises under my hat until June 1st. I am so jazzed about the five new in-colours. They are vivid, bold and playful. Two purplish colours? Yes please!

Even though I am a demo, the amount of items available for pre-order were limited, so I could only order things on June 1st too. They arrived yesterday, just in time for the weekend. I am going to highlight some of my favourite new items from the catalogue and I'll start with the exciting stamp set I won during the Prize Patrol at OnStage - Oh So Electic.

Click for larger!
I was so thrilled to win this set because I love nature designs and the variety of stamps allowed for so many possibilities, plus there's a matching die set if you want to bundle up! Once my new 2017-2018 In-Color ink pads arrived, I pulled out a sheet of Whisper White and just stamped all over the page to try them out! I don't know if this sheet will end up as cards or a background for scrapbooking, but I am so in love with Berry Burst, Lemon Lime Twist, Fresh Fig and Powder Pink. Stay tuned for Part 2!

Your Friend, Christine


Friday 26 May 2017

May Stamping Project: Quick and Easy Project Life Dividers

Sometimes stamping projects don't have to be greeting cards - they can be other fun ideas too! I bought a Project Life 6x8" album and quickly realized what it was missing - dividers! This is such a great chance to just have fun with new stamps and stamp all over a page. Tip - Project Life supplies won't be carried over into the new catalogue.

Supply list for 5 dividers
How I made the dividers:
  1. Measure a 6x8" album page protector against the sheet of cardstock and make a small mark where to cut. Trim the sheet of cardstock down.
  2. Trace the holes in the Proejct Life page protector and punch out with a hole punch. I had to punch two overlapping circles.
  3. Load up your favourite stamps with ink and just stamp all over. Go crazy!
Simple supplies!
 
Simple stamping fun!
Annnnnd that's pretty much it! You could create layers or labels or tabs as well. I only mention this project because it's so quick and simple and great for kids. Instead of cutting each sheet down to size, score and fold where you would cut. Bend the paper backwards and stick down the edges to create a pocket behind the divider. Have fun!

Your Friend, Christine


Sunday 23 April 2017

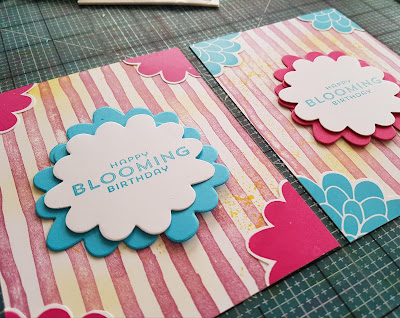
April Stamping Project: Birthday Blooms Floral Greeting Card

I have to get better at posting my projects at the beginning of the month instead of the end! I made a bunch of these card fronts to swap for OnStage Local 2017 and I was really pleased with the response to them. I think instead of using Whisper White cardstock, Very Vanilla could easily stand in to tone done the brightness...but that's up to you!

Hurry! The stamps and dies used in this project are retiring!

Supply list for 16 cards
How I made the cards:
  1. Score Whisper White cardstock lengthwise at the 4.25" mark. Do not cut or fold.
  2. Sponge Daffodil Delight lightly all over the right side of the scored sheets. Follow-up by stamping the right side of the sheets with the spraypaint stamp from Touches of Texture, also in Daffodil Delight.
  3. Cut the sheets in half to make 16 card bases.
  4. Mask off the back of the card with scrap paper. Load up the Brushstrokes stamp with Sweet Sugarplum and stamp the front.
  5. Stamp all over the front of the card with the background stamp using Crumbcake ink.
  6. Now here's the fun part. You can decide to stamp the flowers however you like. As you can see from the samples, I did half Melon Mambo/solid flower and half Tempting Turquoise/regular flower. You will need to stamp a total of 28 flowers on Whisper White cardstock regardless of your colour choice. If you are careful, you can stamp 12 flowers to a sheet.
  7. Once the flowers are stamped, you can cut them out by hand or with the matching die. I ended up fussy cutting them all because I took them to work to get them done.
  8. Now for more flower making! Use the large flower die and cut out 28 flowers. You should have double the amount of stamped flowers. Tip: you can safely cut two sheets of cardstock with the die to save time.
  9. Cut 16 flowers with the large flower die from Whisper White cardstock and stamp with a sentiment. I used the birthday stamp from Flower Patch with Tempting Turquoise.
  10. Cut each stamped flower from step 6 into quarters with scissors. Don't worry about being perfectly accurate. Keep each set of quarters together, however.
  11. Adhere one flower quarter to the corner of each card. You may want to fold the card bases in this case to make it easier to adhere the quarters on the left side of the card front so it lines up with the edge.
  12. Now, divide your pile of non-white flower die cuts into two piles of 16 flowers each. One pile will stay solid. The other half will be cut in half.
  13. Place one solid flower upside down on your workspace and then two halves (also upside down) slightly apart so that there is an upside down V shaped gap between the two halves. Adhere the halves to the whole flower. You may want to use the first flower as a template for the others.
  14. Turn the assembled flower right side up and adhere the white sentiment flower to the front.
  15. Place a dimensional on the back of the assembled flower and adhere to the front of the card to make it bloom!
Birthday Blooms
Click for larger size!
 
Remember, you can always halve my project ideas, but this is another way to stamp a stack of cards that will be a thoughtful gift or provide birthday wishes throughout the year. It may seem too like the card has a lot of steps, but they work up quick with all the stamping and die cutting. I was able to make the cards in a week by the spreading out the tasks.

Your Friend, Christine


Friday 14 April 2017

Easter Stamping Project: Quick Easter Greeting Card

Spring is such a busy time and somehow Easter always sneaks up on me! Too late I realized that I needed to make some Easter cards - and quick! You can easily make 4 cards in one hour with this design.

Supply list for 4 cards
How I made the cards:
  1. Score Whisper White cardstock lengthwise at the 4.25" mark. Do not cut or fold. Turn the paper clockwise and make sure to start stamping on what will be the front of the card.
  2. As you can see, I used the eggs, chicks, basket and rabbit, but you can use any stamp combination you like. First I stamped the egg rows - top and bottom. Then I stamped the chicks. This gave me just enough room to add a row of bunnies. Your mileage may vary. I used a ruler and grid paper to make sure that I lined up my rows.
  3. Colouring time! I coloured in all the areas that I wanted to in subtles colours along with Bermuda Bay, Watermelon Wonder, Mint Macaron, So Saffron and Crushed Curry markers. Feel free to use your own choices. This would be a great step for kids to do while you stamp.
  4. For the background I lightly wet a puddle of Wisteria Wonder and brushed between the images. You may want to practice on paper first to get just the right amount of water and ink for the background of your card. Press the Wysteria ink pad to make a puddle on the inside of the stamp pad. Make sure your brush is just a little wet - too much water and the paper will buckle. Brush between the stamped images and use your finger to smear the colour if it gets too wet.
  5. Cut sheet in half and fold cards. You can also stamp a sentiment inside. Although I love the Basket Bunch set very much, it does need a Happy Easter stamp :-)


Have a happy and blessed Easter!

Your Friend, Christine


Monday 10 April 2017

My First Stampin' Up OnStage!!

I had the most a-m-a-z-i-n-g time at Onstage Local in my hometown. Words cannot describe how fun it was meeting other demos from Western Canada along with seeing the new catalogue and product releases. Wow! From start to finish it was a jam packed day of stamping, presentations, demonstrations, fun and friendship!

For starters, I received some pieces of flair for my lanyard including a first timers button! The square button was for the Prize Patrol during the presentations. It was a great way to keep everyone excited and I was the first at my table to win!! A picture would flash on the screen and correspond with the button in your bag. Woohoo!!

OnStage Flair

In the swag bag were some pens and an exclusive notebook planner and adhesive notes. Of course, there was a stamp set. I love the bag! It's so roomy for all my crafty adventures.

OnStage Bag

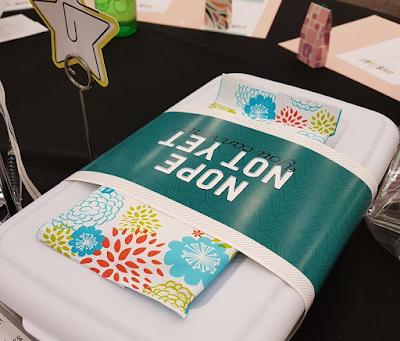
On the tables were centrepieces featuring the new 2017-2018 in-colour collection along with tubs and envelopes that we weren't supposed to peek at :D They contained some of the new product and projects for the afternoon. At the very end of the day, everyone at the table got to take three or so things from the bucket!! I took two stamp pads and a roll of new ribbon.

Craft bucket

It was thrilling to spend all day with my team, learn new techniques and craft, but the absolute best part of the day was at the very beginning. I had made about 40 card fronts to swap and I had barely settled in with my team members before we were approached with swappers! I wish I had made more. Look at my bag full of gorgeous swaps.


Whew! I was pretty pooped by the of the day but I couldn't stop reliving all the fun I had. Sadly I had more pictures to share but I accidentally deleted a bunch of them and couldn't recover them. Fortunately memories last longer. If you have a chance to go to OnStage, be sure to go. You won't regret it. Not only was it affordable but I felt well compensated and well fed for attending :-)

Your Friend, Christine

Sunday 19 March 2017

Why Not Become a Demonstrator?

There's just a couple of weeks for Sale-A-Bration and I thought I would just toss this out there - have you ever thought of becoming a SU demonstrator? Sale-A-Bration is a pretty good time to join actually. The price of the starter kit has decreased over the years and you also get to pick what goes in it, which includes two free stamp sets. I'm told that years ago this was not so. Trust me, it's a great deal, even if you want to be hobby demonstrator like me.

Why would you want to be a demonstrator? How about...
  •  meeting fun new people just like you
  •  sneak peeks at new products
  •   quarterly magazine
  •  loads of tutorials and advice

Why did I become a demonstrator? Well, I mostly wanted to make new friends and I was looking for crafty fun within my neighbourhood instead of having to drive to events on the other side of town. There are Stampin' Up! demonstrators everywhere.

I'm also big into paper crafts and it frustrated me to no end to have a pile of paper and ink that didn't coordinate. My stamping collection was made of random stuff here and there. Once I became a demo I was able to kit up with all the tools I needed. Trust me, anything is 100% more enjoyable when you have the right tools for the right job. Now I can just plan out a card and order all the supplies instead of searching high and low for the right colours or paper and it arrives on my doorstep within a week!

One last thing - it's no pressure. I feel so welcome as a hobby demo by the other ladies on my team. When the time is right I might branch out into parties, but I am good learning for now and that's OK :-)

Your Friend, Christine

Friday 3 March 2017

Sale-A-Bration!

One of the fun things about being a demonstrator is getting a sneak peek at all the upcoming products. I was so busy with visiting friends and family at Christmas that I didn't get a chance to order much beforehand for Sale-A-Bration. I had a very happy mail day last last month where my Carried Away Designer Series Paper arrived along So Very Much and Delicate Details. Who doesn't need a giant thank you stamp?.


But wait, there's more! Yes, I had no idea that there would be a second release of Sale-A-Bration products. I put in an order last night and am looking forward to the glimmer paper and medallion stamp set! Check it out!

Your Friend, Christine


Saturday 18 February 2017

February Stamping Project: Best Birds Happy Birthday Greeting Card

 
My February project is a card that I made for a team swap back in October. It's a really fun card that stamps up quickly - you can stamp a stack and have birthday or congratulations card for a year's worth of celebrations.

Supply list for 16 cards
How I made the cards:
  1. Score each sheet of Crumb Cake before cutting in half to make two 4.25x5.5” card bases. Don’t fold the cards.
  2. Stamp all over the front of the card with the background stamp using Crumbcake ink.
  3. Stamp the inside bottom right of the card with the left facing (male) sparrow from Best Birds using Tip Top Taupe ink.
  4. Use the large flower and smaller flower from the Flower Fair die set to die cut the large and small flowers for the front from Pink Pirouette paper. Here’s a tip - draw a grid pattern on the 12x12” sheet to make best use of your paper to cut the big flowers. Use the scraps from in-between to cut the small flowers.
  5. Stamp 16 branches with Tip Top Taupe ink on Tip Top Taupe paper and die cut.
  6. Stamp 16 right facing birds with Tip Top Taupe ink on Very Vanilla paper and die cut.
  7. Assemble the bird, branch and flowers before sticking down to front of card. My tip - assemble one and then place a sheet of wax or parchment paper over it to use as a guide for the other pieces so they are all spaced the same.
  8. Divide a sheet of Very Vanilla into 1.5x4.25" pieces for tags.
  9. Stamp the desired greeting with Tip Top Taupe towards the right side of the edge of the tag.
  10. Using a craft knife and ruler or Stampin’ Trimmer, cut out the tags. You can fussy cut the banner tail or use a hexagon punch.
  11. Adhere the tags to the front of the card, fold in half and it’s ready to give!
Click for larger size!


I find that I use the Best Birds set a lot - you won't go wrong with purchasing this set for your Stampin' Up collection!

Your Friend, Christine


Friday 3 February 2017

Dear Christine: Do I Need a Big Shot Die Brush?

Dear Christine - do I need a Big Shot die brush?

I must confess that one of the things that held me back from enjoying stamping was not having the right tools for the job. Sometimes there are things in the catalog that seem a little superfluous. Do you need a Big Shot die brush? Yes - especially if you purchased the Up & Away Thinlits Dies. I discovered the hard way that I definitely need the Big Shot die brush after poking out tons of little pieces from this lovely ornate die. Would you want to spend your time craft instead of cleaning dies with a piercing tool? Ooof!
 
While the Big Shot die brush will be going in on my next order, I have used it before. It comes with a foam pad and you just roll it over the die. The foam pad will wear with time, but you can always flip it over and use the other side or wear it evenly by not using it in the same spot.
 
Click for larger image
Not pictured - the mess all over the floor when I bumped the cutting mat! That's another problem to solve :-)

Your Friend, Christine


Wednesday 18 January 2017

Happy Mail Day!

Any day that I receive a box from Stampin' Up is a happy mail day, more so if it arrives just in time for crafty weekend fun! I'm still filling out my collection of ink pads and ordered the Subtles ink pad collection, along with the Lift Me Up bundle. Oh, and there on the left is a belated addition - the Leaflets Framelits Dies to go with the Vintage Leaves stamps I bought a while ago!

Stay tuned as I play around with these!

Friday 6 January 2017

First Post!

Hi friends,

Welcome to my blog! As mentioned above, I am a hobby Stampin' Up! demonstrator and I'm eager to show off the new things I have learned and share new products that I love. I have been a paper craft for a very long time and making cards has always been one of my favourite hobbies. I feel like I'm create a miniature world in a 5x7" or smaller space. I became a demonstrator in Summer 2016 and do it solely as a hobby for now. I dream of some day holding classes however!