I am a quasi-hobby independent Stampin' Up! demonstrator. I do not book parties but I specialize in one on one instruction plus I still wanted a space to show off my cards and share advice about stamping and papercraft. Enjoy! All stamped images and paper are (c) Stampin' Up.

Shop Now

Click here to shop Stampin' Up. You can order stamps and supplies without having a party and still get Stampin' Rewards.

Sunday 23 April 2017

April Stamping Project: Birthday Blooms Floral Greeting Card

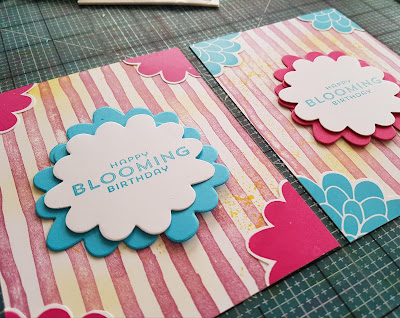
I have to get better at posting my projects at the beginning of the month instead of the end! I made a bunch of these card fronts to swap for OnStage Local 2017 and I was really pleased with the response to them. I think instead of using Whisper White cardstock, Very Vanilla could easily stand in to tone done the brightness...but that's up to you!

Hurry! The stamps and dies used in this project are retiring!

Supply list for 16 cards
How I made the cards:
  1. Score Whisper White cardstock lengthwise at the 4.25" mark. Do not cut or fold.
  2. Sponge Daffodil Delight lightly all over the right side of the scored sheets. Follow-up by stamping the right side of the sheets with the spraypaint stamp from Touches of Texture, also in Daffodil Delight.
  3. Cut the sheets in half to make 16 card bases.
  4. Mask off the back of the card with scrap paper. Load up the Brushstrokes stamp with Sweet Sugarplum and stamp the front.
  5. Stamp all over the front of the card with the background stamp using Crumbcake ink.
  6. Now here's the fun part. You can decide to stamp the flowers however you like. As you can see from the samples, I did half Melon Mambo/solid flower and half Tempting Turquoise/regular flower. You will need to stamp a total of 28 flowers on Whisper White cardstock regardless of your colour choice. If you are careful, you can stamp 12 flowers to a sheet.
  7. Once the flowers are stamped, you can cut them out by hand or with the matching die. I ended up fussy cutting them all because I took them to work to get them done.
  8. Now for more flower making! Use the large flower die and cut out 28 flowers. You should have double the amount of stamped flowers. Tip: you can safely cut two sheets of cardstock with the die to save time.
  9. Cut 16 flowers with the large flower die from Whisper White cardstock and stamp with a sentiment. I used the birthday stamp from Flower Patch with Tempting Turquoise.
  10. Cut each stamped flower from step 6 into quarters with scissors. Don't worry about being perfectly accurate. Keep each set of quarters together, however.
  11. Adhere one flower quarter to the corner of each card. You may want to fold the card bases in this case to make it easier to adhere the quarters on the left side of the card front so it lines up with the edge.
  12. Now, divide your pile of non-white flower die cuts into two piles of 16 flowers each. One pile will stay solid. The other half will be cut in half.
  13. Place one solid flower upside down on your workspace and then two halves (also upside down) slightly apart so that there is an upside down V shaped gap between the two halves. Adhere the halves to the whole flower. You may want to use the first flower as a template for the others.
  14. Turn the assembled flower right side up and adhere the white sentiment flower to the front.
  15. Place a dimensional on the back of the assembled flower and adhere to the front of the card to make it bloom!
Birthday Blooms
Click for larger size!
 
Remember, you can always halve my project ideas, but this is another way to stamp a stack of cards that will be a thoughtful gift or provide birthday wishes throughout the year. It may seem too like the card has a lot of steps, but they work up quick with all the stamping and die cutting. I was able to make the cards in a week by the spreading out the tasks.

Your Friend, Christine


Friday 14 April 2017

Easter Stamping Project: Quick Easter Greeting Card

Spring is such a busy time and somehow Easter always sneaks up on me! Too late I realized that I needed to make some Easter cards - and quick! You can easily make 4 cards in one hour with this design.

Supply list for 4 cards
How I made the cards:
  1. Score Whisper White cardstock lengthwise at the 4.25" mark. Do not cut or fold. Turn the paper clockwise and make sure to start stamping on what will be the front of the card.
  2. As you can see, I used the eggs, chicks, basket and rabbit, but you can use any stamp combination you like. First I stamped the egg rows - top and bottom. Then I stamped the chicks. This gave me just enough room to add a row of bunnies. Your mileage may vary. I used a ruler and grid paper to make sure that I lined up my rows.
  3. Colouring time! I coloured in all the areas that I wanted to in subtles colours along with Bermuda Bay, Watermelon Wonder, Mint Macaron, So Saffron and Crushed Curry markers. Feel free to use your own choices. This would be a great step for kids to do while you stamp.
  4. For the background I lightly wet a puddle of Wisteria Wonder and brushed between the images. You may want to practice on paper first to get just the right amount of water and ink for the background of your card. Press the Wysteria ink pad to make a puddle on the inside of the stamp pad. Make sure your brush is just a little wet - too much water and the paper will buckle. Brush between the stamped images and use your finger to smear the colour if it gets too wet.
  5. Cut sheet in half and fold cards. You can also stamp a sentiment inside. Although I love the Basket Bunch set very much, it does need a Happy Easter stamp :-)


Have a happy and blessed Easter!

Your Friend, Christine


Monday 10 April 2017

My First Stampin' Up OnStage!!

I had the most a-m-a-z-i-n-g time at Onstage Local in my hometown. Words cannot describe how fun it was meeting other demos from Western Canada along with seeing the new catalogue and product releases. Wow! From start to finish it was a jam packed day of stamping, presentations, demonstrations, fun and friendship!

For starters, I received some pieces of flair for my lanyard including a first timers button! The square button was for the Prize Patrol during the presentations. It was a great way to keep everyone excited and I was the first at my table to win!! A picture would flash on the screen and correspond with the button in your bag. Woohoo!!

OnStage Flair

In the swag bag were some pens and an exclusive notebook planner and adhesive notes. Of course, there was a stamp set. I love the bag! It's so roomy for all my crafty adventures.

OnStage Bag

On the tables were centrepieces featuring the new 2017-2018 in-colour collection along with tubs and envelopes that we weren't supposed to peek at :D They contained some of the new product and projects for the afternoon. At the very end of the day, everyone at the table got to take three or so things from the bucket!! I took two stamp pads and a roll of new ribbon.

Craft bucket

It was thrilling to spend all day with my team, learn new techniques and craft, but the absolute best part of the day was at the very beginning. I had made about 40 card fronts to swap and I had barely settled in with my team members before we were approached with swappers! I wish I had made more. Look at my bag full of gorgeous swaps.


Whew! I was pretty pooped by the of the day but I couldn't stop reliving all the fun I had. Sadly I had more pictures to share but I accidentally deleted a bunch of them and couldn't recover them. Fortunately memories last longer. If you have a chance to go to OnStage, be sure to go. You won't regret it. Not only was it affordable but I felt well compensated and well fed for attending :-)

Your Friend, Christine