I am a quasi-hobby independent Stampin' Up! demonstrator. I do not book parties but I specialize in one on one instruction plus I still wanted a space to show off my cards and share advice about stamping and papercraft. Enjoy! All stamped images and paper are (c) Stampin' Up.

Shop Now

Click here to shop Stampin' Up. You can order stamps and supplies without having a party and still get Stampin' Rewards.

Sunday 23 December 2018

2018 Christmas Cards

Whew! November and December were busy months. I hardly had a chance to sit down and do the banking.

I sat down and made a few Christmas cards and now that they have been sent off, I can share them. Click for larger. Here is this year's Christmas card:

Christmas Wishes card featuring pine tree die cuts
Christmas Wishes

Here's another card I made, but I didn't get around to sending any of them off. Oh dear! Late for this year, early for next, I always say. I like the tone on tone look and the shimmer paper really looked great when embossed with the Blizzard background thinlits die.

White Christmas deer card


Have a safe and warm holiday season! Stay tuned for new exciting products in 2019...the Sale-A-Bration catalogue drops January 3rd :-)

Your Friend, Christine


Wednesday 31 October 2018

October Stamping Project - Take Your Pick Tool Sipcase

October's project is a little different! It's easy to forget that papercraft is more than just cards :)

I learned from one of my team mates that it is totally a thing to make a box for your Take Your Pick Tool as the original box is quite flimsy. You can find the instructions on Old Stables Crafts. I took a different approach and made a slipcase for the box.

This is where the minute measurements of the Simply Scored board really shined.

I measured a sheet of Berry Burst cardstock against the box and carefully scored everywhere I wanted a fold. I wasn't sure how much paper I would need, so I trimmed the excess off.

Then, for the top, I personalized it with a scrap piece of Whisper White cardstock using the Petal Palette stamp set and 2017-2019 In-Color inks. Admittedly I printed out my name because it was too intimidating to stamp it out!


As for the Take Your Pick Tool itself, I love it. I love that the spatula can help you pop up any whoopsies that have been stuck down. The putty tips take the frustration out of affixing small details and it's easier to hold the bigger stylus than the one that comes with the Simply Scored board.

Your Friend, Christine


Sunday 30 September 2018

September Stamping Project - Grateful Heart Autumn Greeting Card

As a fall baby, I eagerly collect anything fall. It’s easy to have fall overlooked with Thanksgiving, Halloween and Christmas. It doesn’t help that fall is so short where I live - all it takes is a week of strong winds and all those lovely coloured leaves are gone. This year, September has been particularly rainy, so I enjoyed working with these colours - ones that I don’t typically use.

Thinking of You with a Grateful Heart

Supply list


  1. Score a sheet of Very Vanilla cardstock, but don’t cut in half.
  2. Stamp all over the right side of the sheet of Very Vanilla cardstock with stamps from blah blah. Try stamping in Mint Macaron and Crushed Curry first, then stamp again in Blackberry Bliss but offset.
  3. When you are satisfied with your stamping, sponge around the edges with a little Cajun Craze. Cut the sheet in half and continue sponging.
  4. Cut a 2” strip from a sheet of Blackberry Bliss cardstock. Cut in half so that you have 2 2x5.5” panels.
  5. Die cut small leaf and flower shapes from Mint Macaron cardstock.
  6. Die cut a square from Whisper White using the ~2.5" (inside) square framelit. Stamp sentiment in Blackberry Bliss ink.
  7. Die cut a scalloped square from Crushed Curry cardstock using the ~3.5" (inside) scalloped framelit.
  8. Die cut maple leaves from Cajun Craze cardstock. You can also just stamp the interior shape instead of die cutting it. Try mixing and matching colours too.
  9. Time to assemble!

Now, if you are a keen SU fan, you might go, “Whoa? Mint Macaron? Blackberry Bliss? Are those current colours?” Yes, yes they are! I am especially thrilled that Mint Macaron returned along with a few other colours in the 2018 colour refresh. You can buy a sampler pack of paper, all the new inks or markers and try them out for yourself.

Your Friend, Christine


Sunday 16 September 2018

Sunday Sketch - September Stamping Project

Since I always post my projects at the end of the month, I decided to share the sketch for them at the beginning of the month. Check back in a couple of weeks to see how the sketch becomes reality. I already gave a hint about the colours :-) A sketch doesn't have to be very detailed - just enough to capture all the information necessary.

Card sketch

Your Friend, Christine


Wednesday 12 September 2018

Stampin' Up! 2018 Holiday Catalogue Favourites

If it's one thing that you can count on, it's Stampin' Up! to release three catalogues a year - holiday, occasions and the annual catalogue. As a demo, I get sneak peeks of all of them and sometimes it's so hard to wait to show off the new products.

I think this year's holiday catalogue is stellar and better than last year's. There's a huge variety of stamps and greetings and paper, oh my! I'm not a Halloween person, so I steer right to the Christmas stuff. It may be too early to think about Christmas, but when you're a crafter, it's never too early! Sometimes I start my Christmas cards in August :)

Anyway, here are three of my favourite items so far - stay tuned for more! All are photographed on Joyous Noel Special DSP.

Merry Christmas to All

I bought just the stamps and not the bundled dies - I thought the stamps were more worth it. Sometimes you just want a single word to build your greeting or fit your space, so I felt this was a must have.

Merry Christmas to All

Feathers & Frost

Hehe, of course I had to get this cute little set because of the birds! The swashy leaves and berries was also inspiring along with the sentiments. I really liked the "hand stamped by" set - I can see using it a lot!


Buffalo Check

This hefty background stamp reminds me of some DSP from last year or maybe it was the year before - but it came in green. Now you can have the same pattern in any colour. So looking forward to using this. I think it will go well with the Hardwood background stamp or embossing folder.

Buffalo Check

Well, there you have it! Stay tuned for more favourites and my monthly stamping project.

Your Friend, Christine


Friday 31 August 2018

August Stamping Project - You Fill Me With Happiness Teatime Card

I have to backdate this entry because it was a little late. As I mentioned a couple of months ago, we had an unplanned repair and it really upended things. I had to pack away a lot of craft supplies and we were packing and unpacking - who knew such a little thing could cause a big disruption? When my desk was set up again, I was so eager to play with all my new paper that I decided to make a variety of rectangular and square cards.

Supply list

  1. I made rectangular and square cards. For the rectangular bases, I scored a sheet of Very Vanilla cardstock at the 4.25” mark and cut each sheet in half. I did the same for the square cards, but trimmed them to 4.25x4.25”.
  2. Cut the fronts from Tea Time DSP. The fronts of the rectangular cards will be 3.75x5”. The fronts for the square cards will be 3.75x3.75”. An easy way to make a variety of card fronts is to cut 3.75” strips from the 12x12” DSP sheets, then trim into 5” rectangles or 3.75” squares.
  3. Stamp the tea cup on Whisper White cardstock in Fresh Fig ink. Rich Razzleberry would also look great! Die cut each one.
  4. Die cut a matching amount of the largest doily shape and set aside. Die cut some from vellum paper too if you wish.
From here on, the rest is up to you! I used up some scrap paper, used the leftover pieces of the DSP and just tried different arrangements to make some quick simple cards and more layered ones. As you can see from the samples, I made a couple of whoopsies. I didn’t realize that I scored some of the cardstock at the wrong point. A simple solution was to move the DSP front to the fold edge. Remember, arts and crafts is all about problem solving sometimes!

I added some small touches with Stampin' Blends markers and I could have used some ribbon here or there - but it was just so good to finally CRAFT, that I didn't want to get too crazy! Click on each picture for a larger view.

Tea Time card
Tea Time card
Tea Time card
Your Friend, Christine


Sunday 5 August 2018

Sunday Sketch - August Stamping Project

So, I came up with a new idea! Since I always post my projects at the end of the month, I decided to share the sketch for them at the beginning of the month. Quite genius, if I do say so myself! Check back in a couple of weeks to see how the sketch becomes reality.

Sunday Sketch

Your Friend, Christine


Thursday 26 July 2018

July Stamping Project - Serene Garden Thank You Cards

My team held a card swap earlier this month to celebrate the new catalogue and it was...a challenge for me. As usual I had an idea in my head and quickly sketched it out. I'm not sure if this makes any sense, but here was the original idea:

As you can see, it turned out very differently! Once I started making the cards, I realized I wouldn't have enough space to make an aperture card and I didn't have a sentiment stamp small enough to fit in a round space. Creativity is often all about problem solving, so I attempted to solve the problem with a pink strip across the card front and a bit of glittery ribbon to give it some pizazz. However, the cards looked too dull. Dang! One of my crafty friends suggested that I use a colour that would make it pop and she was right. Here's the final design in the pink and green combo:


Stay tuned for the orange/blue combo - I ran out of time for a pic!

Another challenge was fussy cutting out all those birds. Sometimes it seems like spending the extra money on dies isn't worth it, but, let me tell you...if you want these cute little birds on lots of cards, you'll want the dies to go with them. Bonus tip! Did you know that there is a 10% discount on new stamp and die bundles in the first year of production? The sets are unbundled after the first year and must then be purchased separately.

Supply list for 20 cards

  1. Score an 8.x5x11” sheet of Very Vanilla cardstock down the middle. Do not fold.
  2. Stamp all over the front edges of the cards with the mesh stamp from Best Birds in Crumbcake ink. Stamp down the middle so that when you cut the sheet in half, that edge will be stamped.
  3. Cut the bases in half. Load up a Stampin' sponge with Crumbcake ink and sponge around the edges and towards the top of the card front.
  4. Cut 20 card front panels. I cut 10 Coastal Cabana and 10 Calypso Coral, but you can do 20 of your preferred colour. Each panel is 3.25x4.5" tall and you'll be able to get four panels from a letter sized sheet.
  5. Stamp leaves and flowers in a corresponding colour on the front panels. You can rotate the small leaf stamp if you want to fill in both top corners. Fill in the extra space with the dots stamp from Petal Palette. Sponge the front lightly with Crumbcake ink. I went over them with a Wink of Stella pen.
  6. Cut 20 2x3" Melon Mambo pieces if you are making the green and pink version or 20 2x3" pieces from a sheet of Pacific Point for the other version. Or 10 of each for variety :-)
  7. Pick the red roses or blue and yellow flower sheets from the package of Garden DSP. Cut 20 2x2.5" pieces and set aside.
  8. Stamp the Serene Garden bird 20 times over a sheet of Very Vanilla with Early Espresso. Leave room to die or fussy cut. Cut out and set aside.
  9. Cut 20 1x3.25" Powder Pink strips. Stamp "Thank You" in Fresh Fig in the middle of each strip and set aside.
  10. Cut 20 4" pieces of Tea Room ribbon. I used white for the green and pink combo and green for the orange and blue combo.
  11. Whew! That's a lot of prep. Time to assemble! You will probably find it easiest to start with the front panels. Adhere the pink Thank You strip about 1.5" from the top. Run a little bit of Snail or other tape runner adhesive to the back side of a ribbon strip and center it under the Thank You strip. I used tape to secure the ends to the reverse. Add the bird above the Thank You strip.
  12. On the front of the card base, adhere the solid rectangle in the upper left hand corner with the longest edge point down.
  13. Adhere the patterned rectangle in lower right hand corner with the longest edge along the bottom.
  14. Add Stampin' Dimensionals to the back corner of each card front and centre it on the front of the card.

Now, it would be easy to say that I chose the Serene Garden stamp set because it has birds, but the line style art is really unique and eye catching - a nice clean look that you don't often see on stamps but you probably have in icons and illustrations. I gave away all but two cards in the swap - I'll have to stamp some more or come up with a new idea to have on hand. Until next time, I remain...

Your Friend, Christine


Wednesday 11 July 2018

A Crafter's Best Friend - the Raskog!

Raskog! What the heck is that? You may have heard the name but you have surely seen the three tiered utility cart or one of it’s cousins on Pinterest or your friend’s craft room. As an IKEA fan, I remember wanting a Raskog so much when they were first released. There were two things I couldn’t get over - the hospital blue colour and the price, which I think was around $69 at the time.

Fortunately, the price came down and more colours were released! Never was I so excited about a piece of furniture in my life - and I think that is why people adore their Raskogs and are so devoted to them. If you don’t believe me, google “Pimp my Raskog” or join the Facebook group of the same thing. What makes the humble utility cart so appealing is it’s infinitely customizability. It’s not just A Raskog, with a little creativity, it becomes YOUR Raskog. Folks add paint, vinyl stickers and trick the carts out with containers and more. Add a cutting board and you have an instant work surface. Flip over the top tier for a sewing cart. If you’re short on space, Raskog to the rescue! All you have to do is search for "Pimp My Raskog" and admire the way people have customized their little carts. It's amazing how attached we can be to an inanimate object. My theory is that a Raskog is just so handy and an extension of our creatives selves that we can't help but fall in love with them.


The only downside to Raskogs is that they are a little rascally to assemble, with tiny screws that like to fall out of the hole while you try to screw them in. I think it took about a half hour to assemble and then I soon busy organizing all my craft stuff. It’s been a constant struggle to keep the craft stuff under control - it just gets all over the place no matter how much IKEA furniture you own - but it has made a huge difference in keeping my supplies off the kitchen table. I have seven cups hanging off the side of the top tier for pens and pencils, then two on either end for cutting utensils, sponges, adhesives and random stuff. Antonius baskets will fit in the tray - which I previously featured.

All my catalogs and albums are within easy reach on the top tier along with some larger crafty items. My Big Shot lives on the second tier - the handle hangs outside the tray, while the third tier is a catchall of papers and projects. I love that I can wheel my supplies out of the way or closer to the kitchen table - but it lives just outside the kitchen most days! It’s been tempting to get a second one, I have to confess for the basement where a lot of my art supplies are.

If you don’t have an IKEA near you, don’t worry. You can find Raskog style carts at Michaels, Sam's Club and Target. I have to admit, it's been tempting to get another...

Your Friend, Christine


Wednesday 27 June 2018

June Update

Whoops, ran out of month again! There were many good reasons, I assure you! First of all, my mom and I went on our first vacation together in many years. We went to the lovely Okanagan region of British Columbia and enjoyed a week there.

For some reason, I always end up watching home and garden shows on vacation. Perhaps we watched a few too many because soon I couldn't wait to get back and rearrange the basement. As it happened, there was an unplanned opportunity to do so! Let's call the unplanned opportunity a leaky water line.

Once I realized all the potential, my husband and I set to work on cleaning OUT the basement. It didn't seem like a lot of stuff...until we found ourselves marking multiple trips to the recycling depot. Knowing that I would have the basement of my dreams motivated me as we tossed, sorted, cleaned and scratched our heads at some of the stuff we found. Stay tuned! I took some before pictures.

I am working on a team swap, but working on the basement was exhausting. Things downstairs moved upstairs and I tried not to pack too much of my stamping stuff away. I managed to break down the cards into steps and hope to finish them this weekend for the next team meeting. Here's a sneak peek - it took forever to fussy cut all the little birds!


Whew! June flew by pretty fast. I did order a lot of the new products. May can be a scary time for a demonstrator because you want the new stamps, but there may be some things from the previous year that you want too. I'm really in love with the Tea Room suite, especially the set of cards. These are perfect for scrapbooking or quick makes when you need one. I don't believe it, but I forgot to order the stamps and die set despite ordering the paper...ah well! It happens :-)


Wish me luck with my reno - I'll need it! The result will be worth it.

Your Friend, Christine


Saturday 19 May 2018

May Stamping Project - Mother's Day Cards

Making a handmade card for Mother's Day always takes me back to grade school! This year I reused some leftover card fronts from OnStage swaps to make cards for my MIL and my mother. I hate anything to go to waste in the craft room! I customized them and made 5x7" card blanks to affix the card fronts to. Voila!

If you miss purchasing them when the new catalogue comes out, they may show up on the Clearance Rack.


Your Friend, Christine


Friday 20 April 2018

April Update - Stampin' Up! Onstage

I can't believe how fast April went by! It seems just like yesterday I was hopping on a bus to Red Deer, Alberta, after work for OnStage. This is a special Stampin' Up event for demonstrators only and it is loads of fun! Not only do you get to meet other demonstrators and hang out with your team mates, you are treated to sneak peeks of new stuff, craft with new stuff and go home with new stuff! It's such an exciting event and one where I feel special and recognized. It's thrilling to see others accomplishments and celebrate their successes. It was also extra special because it was SU's 30th anniversary!

Woo!
Everyone received a reversible tote bag with a planner and stamps - naturally!


Inside the bag was also a fun surprise - a light up letter box. Fuuuunnnnn!


I learned a lot of new techniques just by swapping with other demos. My favourite tip from OnStage was to fill a plastic baggie with embossing powder, stamp with Versamark and then dip the piece of paper into the baggie to coat. Using embossing powder has always been a little scary for me because I just picture glitter getting everywhere. My favourite part of the event was swaps. I just loved coming home with new ideas and my swaps were well received. I remembered to keep one of each for myself.


I can't wait until next year!

Your Friend, Christine


Friday 30 March 2018

March Stamping Project: Happy Easter Egg Greeting Cards

Somehow Easter always sneaks up on me, so I designed a simple card for a fast turnaround. I made these double sided flat cards, but with a few changes you can make them into regular cards.

Supply list for four flat cards

Click for larger
Cut a sheet of Elegant Eggplant cardstock into 4 4.25x5.5" pieces.
  1. Cut two sheets of Whisper White cardstock into 8 pieces. First, trim the cardstock down to 7.5x10" sheets. Save the scraps for later. Cut the sheets in half at 5" on the longest side and then in half again at 3.75".
  2. Trim the leftover strips to 0.75x3.5".
  3. Stamp "Happy Easter" on the strips with Elegant Eggplant ink and notch each end.
  4. On another piece of cardstock, stamp the largest egg in Elegant Eggplant. Colour if you wish.
  5. Carefully cut out each large egg with scissor snips.
  6. Sponge the front panel all over with Daffodil Delight and affix to one side of the Elegant Eggplant panel.
  7. Take the back panel and sponge the edges with Daffodil Delight. Stamp leaves and a rabbit in Elegant Eggplant ink. Affix that to the Elegant Eggplant panel. Make sure both front and back are facing the same way and one isn't upside down :)
  8. Stick down the Easter egg to the front.
  9. Place 2 Stampin Dimensionals on the back of the Happy Easter sentiment and stick on the front.

One of the reasons that I chose the decorative egg over the striped one in the set was that it reminded me of eggs I used to make in school back home in Edmonton. The art of traditional Eastern European egg decorating is lots of of fun! Have a happy and blessed Easter!

Your Friend, Christine


Sunday 11 March 2018

Keeping Cutting Dies Organized - How I Do It

I have a funny story about why paying attention to storing dies is so important. Years ago I bought a rectangular die set because it had one or two sizes I needed. Well, I misplaced those dies. No problem, I ordered another set and strived to look after them better. Wellllll...I misplaced the dies from the second set. Then I ordered a third set! Somehow I managed to find all the missing dies, so now I can do my die cutting thrice as fast.

The problem is though, dies are expensive and you can’t always get a replacement set. Unlike stamps, dies present their own little storage problem. They don’t always stick back on the sheet nicely and the packaging is a little mysterious. Some people get magnet sheets for their dies and empty DVD cases. You can also make a binder with magnet sheets and plastic sleeves.

Leaflets Framelits dies

I use the original packaging because I’m cheap and eco-friendly like that, plus I don’t want to take up more space than I have to. I may get to the binder stage some day! But what's working for me now is identifying all my dies by cutting each one out on scrap paper and affixing them to the paper liner. This way I can test them out, use up scraps and identify them quickly by grouping them together. Any other suggestions? Leave a comment!


Your Friend, Christine


Tuesday 27 February 2018

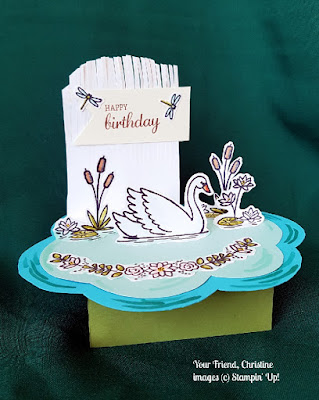
February Stamping Project: Lovely Swan Centrepiece or Decoration

LOL you may have expected a Valentine’s Day card or project this month, but instead I present a project that is just as full of romance and love as any card. When I saw that display stampers were wanted for for OnStage, I literally jumped at the opportunity to apply. And I had to jump because I only had a few things that qualified for the three cards, one scrapbook page and two 3-D objects.

This idea materialized somehow except that I was lying in bed thinking about it and had to get out of bed to quickly sketch it before I forgot. When the Lovely Swan stamp set appeared in last year’s Occasions catalog, I knew I had to order it not just because it featured a bird - but because it looked so versatile for any card that needed a touch of flowers or nature. I will get around to updating this post with some instructions and a supply list - I didn't really keep track of how I made it!

Lovely Swan Centrepiece
Click image for larger


Your Friend, Christine


Sunday 4 February 2018

The One Piece of IKEA Furniture Stampers Can't Live Without

A funny thing happens when you become a Stamping’ Up demonstrator - you acquire a lot of stamps! One of the reasons I joined was due to the discount but I was surprised how easily I fell in love with some designs. My stamp collection was pretty small before, but it exploded last year. How to store them all?

I have a small office/craft room that I kitted out with Billy bookshelves years ago to display my toy horse collections and be a reading nook. Unfortunately I never get the chance to read anymore - it’s a hobby that requires time and peace, which is hard to do with my pet birds. I donated some of my books, moved some things around and bought an extra book shelf for my biggest Billy bookcase (yes, you can do that!). This freed up my two Benno CD/DVD towers. It wasn’t quite enough room because I still had books I wanted to keep. Eight or nine stamp case sized cubbyholes can be configured and depending on whether you collect wood or cling stamps, 6-11 sets can be stashed per cubby.

Since we don’t live near the IKEA, I plotted and planned my shopping list. The Gnedby CD/DVD towers are now a fraction of the price of the old ones and I had just enough space left in the office for one, where I stashed the books. Whew! Now that I had space for all my stamp cases, I had to organize them. But, that is another post! You will see that I marked all the discontinued sets with a red sticker. I always try to feature current products just in case you see them and want to order them right away. Speaking of, Sale-A-Bration is one until the end of March, so make sure you make a qualifying order in case you want some of the free stamps.

Here's a little peek at my craft room - if it wasn't a disaster at the moment, I would take a wider photo. Each month gets better and better though. In theory I should be able to make a video by December ;-)

Click for larger


Your Friend, Christine


Sunday 28 January 2018

January Update

I can't believe I'm running out of January! There was so much I wanted to share, but I was too busy being sick or crafting. I'll wrap up three things in one post though!

First things first, it's time to Sale-A-Brate! I could not wait to put my order in on January 3rd. Sale-A-Brate is more than a great time to join Stampin' Up, it's a fun time to earn bonus stamps and paper. I can't wait to make something with my Lovely Friend set. There are two reward levels at $60 and $120 purchases, so now might be a good time to stock up on supplies for a year of card making and card giving :-) One of the products I have my eye on is the Mixed Medallions set. Check out the Sale-A-Bration brochure.


Woohoo! Stampin' Up has been around 30 years. That's quite a milestone for many companies. With my last order I received this lovely pin. I was looking over some of my older SU catalogues and it's fascinating how trends come and go in the crafting world. I used to work at a Canadian craft store chain, Lewiscraft, and someone there told me that crafts are always on a ten year cycle. Maybe that has shrunk since the advent of YouTube and Pinterest - a lot of crafts seem pretty evergreen these days. I registered for OnStage in April and I can't wait - it's going to be a great time!


January might be a great time to start goals, but remember you can start goals any time of the year. I jotted down six things I wanted to accomplish this month and one of them was to create an Instagram account. One of the things that was stopping me is that I did not have a stamp that said "hello" for my first post. How ridiculous is that? Problem solved with the Eastern Beauty stamp set. This set is actually quite versatile and you can make a lot of cool repeating patterns with it.


Your Friend, Christine


Monday 8 January 2018

Happy New Year! Time to get organized

Happy new year friends! I don't have much in the way of 2018 resolutions this year, but I have been dying to reorganize my office/craft room. We promptly went to IKEA and then we promptly came down with colds, so I haven't had a chance to assemble my new Gnedby CD/DVD shelf. I have a couple from when they were called Benno. Not only are they good for CDs and DVDs, but paperbacks and Stampin' Up sets!

In the spirit of SU's motto "Inspire create, share", I hope to inspire you to create more by sharing by sharing this tip. I find when I'm designing and making cards, bits get everywhere and then I have to re-stamp or cut them again. Usually I toss everything into a dollar store basket, but do you know what's better than a dollar store basket? An IKEA Antonius basket. They're the ultimate project basket. The 6" middle compartments will hold your small paper pads and embossing folders or a bunch of quarter fold cards. The smaller compartments will wrangle your adhesives and scissors or keep all your Stampin' Blends markers together too! They are $2.99 Canadian and I scooped up four of them because IKEA is an all day trip for us. Oh, and the Antonius basket will fit in your Raskog. What's a Raskog? Stay tuned :-D

You'll thank me at Christmas!


Your Friend, Christine